Step 1: Download the Android Studio IDE from https://developer.android.com/studio
Step 2: After opening the .exe or the setup file, you will see this window. I already have installed Android Studio so it is asking to Uninstall the old version. If you are installing fresh, no need to worry, just hit 'Next>' and go ahead by choosing a path where you would like it to be stored.
Step 3: After installing it successfully, a window will be opened (if you have selected start Android Studio after install finished). If not opened, then go to C:\Program Files\Android\Android Studio\bin\ and double click studio64.exe
For quick access create a desktop shortcut.
In this window, to create a new project, click on the first option: '+ Start a new Android Studio project'
Step 4: As the first project and program has to be simple, we will be creating an Empty Activity. Click on the 'Next' option.
Step 5: This window has multiple options to select from:
Name: You can set a name to your project under this field.
Package name: This is a very important part of your app. A package differentiates your app from all other apps.
Save location: You can change the default project location by setting it here.
Language: Now there are two languages that support Android programming. Java and Kotlin. Though Kotlin is the official programming language of Android, I like Java. Again its your wish.
Minimum SDK: This option helps you to support you app for devices with old APIs. Setting it to API 16 shows support for 99.8% devices, so no need to change it.
Use Legacy android.support.libraries: This option is to be ticked when we want to include other libraries in our app. For now to make a hello world app, leave it unticked.
Please Note: Keep your internet connection ON before clicking finish.
Step 6: When the first project is created it will start downloading the necessary stuff. Let it finish downloading.
Step 7: After the downloading gets over, it may show error. If not then skip the steps.
For me, it was with error: Module 'app': platform 'android-29' not found.
Step 8: So lets see what is wrong. The android-29 is an api level for Android version 10.0 or Q. That means we have not installed android-29. In order to install it, click on the sdk manager shown with a red arrow.
Step 9: After clicking on SDK manager, a window with all the apis will be displayed. Click the Show package details at the very right bottom corner so that you will be able to select necessary stuff individually.
Once you are able to see the selected Android SDK Platform 29, click Ok to continue installation.
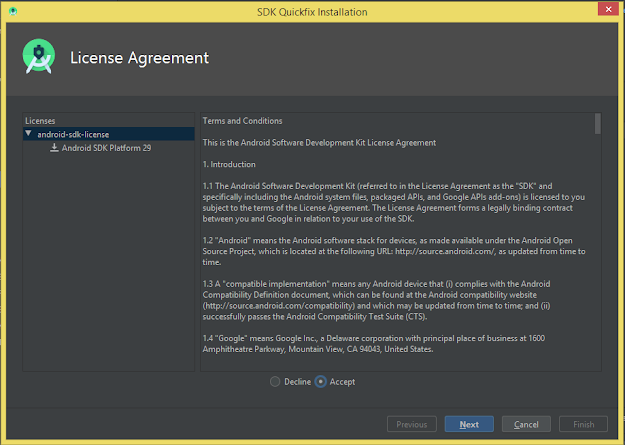
Step 10: Read the 'Terms & Conditions' and select the 'Accept' radio button. Hit 'Next' to continue.
Step 11: Here you can understand why we did not download everything from Android 10.0 (Q) and rather selected just one from Show package details.
Click 'Ok'.
After successfully downloading it you will see no errors. But in order to run the app either you will need an Android device or an emulator.
Step 12: In your android device, go to Settings -> About Phone -> Build Number (See at the bottom). Tap 7 times on it to open the Developer option.
Step 13: The developer option will be enabled and can be found under Settings. Tap on it to open a new panel.
Step 14: In this step, connect your device to PC and keep the Android Studio IDE open. In device, keep two options ON in developer option. The first one is the main (at the top) and the another is USB debugging.
Step 15: Once all this done, you will see a window asking debugging permission (in your device) while showing your computer's RSA key. Allow it by pressing 'Ok' and finally in the Android Studio, you will see your device's name at the place where the red arrow is pointing. If your emulator is already opened, click the drop down option.
Congratulations! you are able to show the output on your phone through USB debugging.
To avoid attaching USB connection and to enjoy wireless WIFI debugging please follow the link:
http://whatanandroid.blogspot.com/2020/07/how-to-do-wireless-debugging-in-android.html


No comments:
Post a Comment